Perhaps the first idea crosses your mind is using Premiere Pro to change the aspect ratio. However, as industry-level video editing software, Premiere is too tricky to learn by newbies. Besides, it is very buggy to convert the video aspect ratio. Though there are solutions to correctly change video aspect ratio in Premiere, very possibly you have to invest much more time on fixing up the known issues like Premiere refuses to change ratios, black edges, incompatiable codec, and more. These might be a burden for ordinary users.
As you can imagine, there are many better ways of getting the stuff done than using this bulky software. Keep reading, we are going to introduce how to change aspect ratio with iMovie, Windows Movie Maker and VLC media player. And we'll also talk about the ways to use another 4 tools (VideoProc, HitFilm Express, DaVinci Resolve, Final Cut Pro) to change video dimension on Windows and Mac within a few clicks.
1. Change Video Aspect Ratio in VideoProc Converter AI [Lossless]
The fastest way to resize or change the aspect ratio of a video on Windows and Mac without losing quality is using VideoProc Converter AI (former name VideoProc). It is a useful and basic video processing application that comes with the capability of changing video aspect ratios in seconds. Benefited from the application of high quality encode engine, the whole process won't cause any visible quality loss.
Highlight features of VideoProc Converter AI as a handy aspect ratio changer
- Enable to change the aspect ratio of videos without adding black bars, stretching up pictures, or diminishing quality.
- Convert video in any dimension to 16:9, 9:16, 1:1, 4:3, 4:5, 2:1, 2:3, and any other customized aspect ratio.
- Wide input and output options which can cope with 4K/8K HEVC, VP9, MP4, and MOV, etc.
- Customize the output quality by adjusting properties in frame rate, bitrate, resolutions, and more.
- 47x faster speed than real-time play while keeping low CPU usage thanks to the support of GPU acceleration.
- Extra features including cut, trim, crop, split, rotate, denoise, deshake, merge, and more.
Note: The Windows version now supports AI-powered Super Resolution, Frame Interpolation, and Stabilization to enhance video and image quality. These AI features are not yet available in the Mac version but will be coming soon.
How to Change the Aspect Ratio of a Video on Mac and PC Fast without Quality Loss
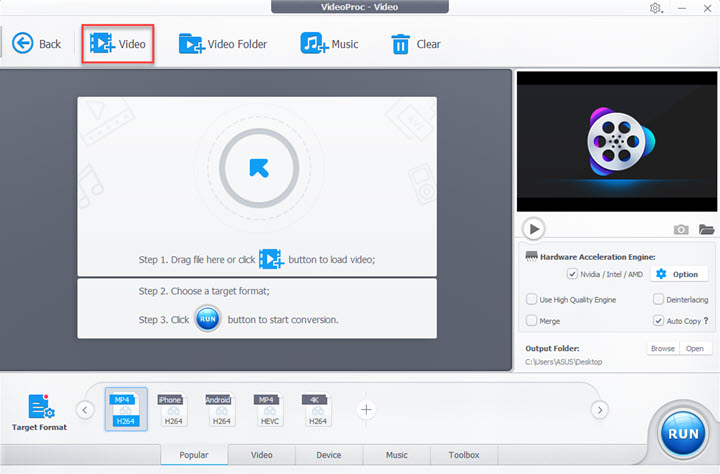
Step 1: Run the best video converter on your computer, and then choose the Video option.
Step 2: Click + Video button to import the video which you plan to change its aspect ratio. Then you need to choose the video output format that you prefer in the Video option at the bottom. You can click Target Format to get more formats and preset profiles for output.

Step 3: Now you have two options to change video aspect ratio in VideoProc Converter AI.
Option 1: Resize the video.
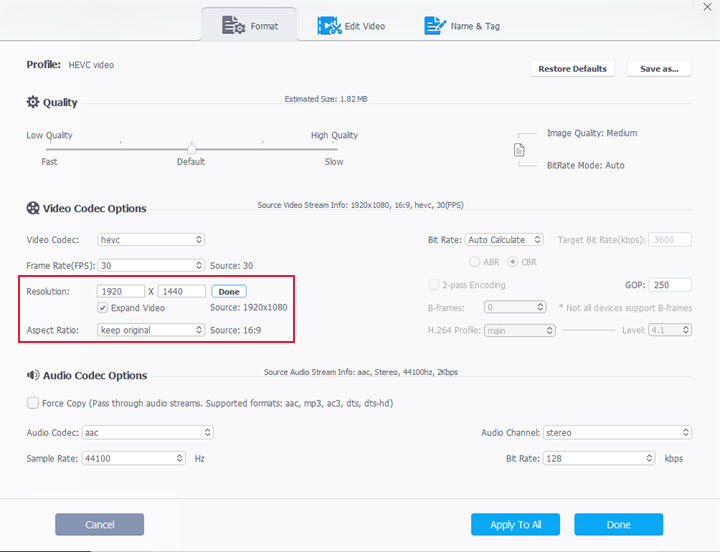
Choose the Codec Option which is located at the right corner of the video info bar to open a sub panel.
Choose keep original in the Aspect Ratio option, check the box before Expand Video.
Then tweak the resolution according to your target aspect ratio. For example, to change a 16:9 video (1920x1080) into 4:3, you need to customize the resolution to 1920x1440. You can use an aspect ratio calculator to calculate a proper resolution for the video in the wanted aspect ratio.
Click Done to save the changes.

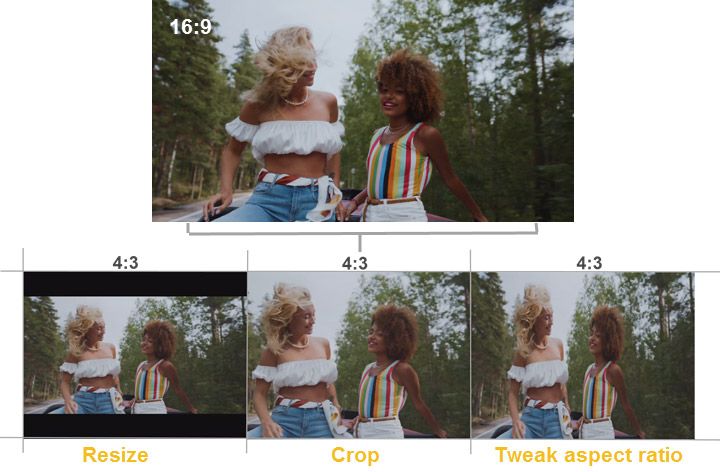
Note: Simply tweaking the aspect ratio in the sub panel will cause distortion because it has to stretch or squeeze your video to fit the desired aspect ratio.
Option 2: Crop the video at the desired aspect ratio.
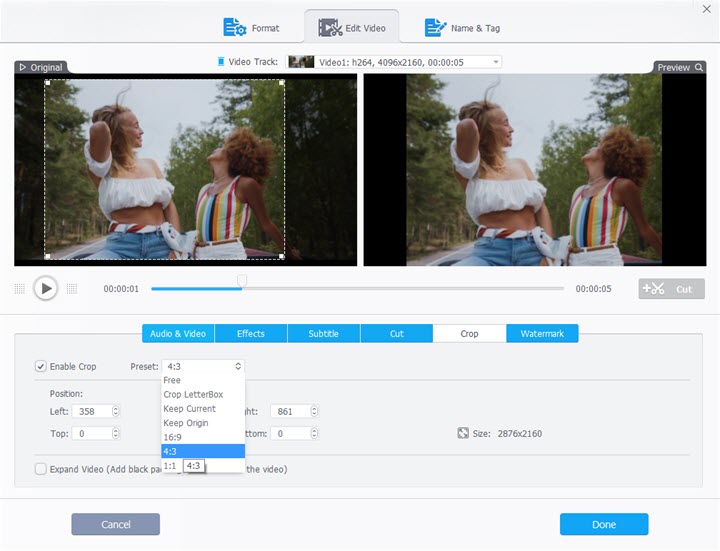
Click Crop in the toolbar of the video. Enable crop and choose a preset aspect ratio in the drop-down menu. You are also enabled to move the box to decide which area to display. Then click Done to get back to the main interface.

Step 4: Toggle the Hardware Acceleration Engine option to enable fast conversion speed, choose an output folder, so you can easily find the file after converting, and then click the RUN button to start exporting.
Compare Different Ways of Changing Video Aspect Ratio

2. Change Video Aspect Ratio in iMovie

iMovie resizes videos simply by Crop at 16:9. When we crop a video, it means cutting off some pictures on either side or top/bottom borders. Obviously, it will lead to image loss. In addition, since iMovie doesn't provide the specific aspect ratio options. You can NOT export the video in other aspect ratios, for example, 9:16, 4:3, 1:1, 4:5, and let alone other free forms.
We've made out the tutorial on how to change aspect ratio in iMovie on iPhone >>.
3. Change Video Aspect Ratio in Windows Movie Maker
In Windows Movie Maker, you are given no access to enabling crop or aspect ratio change commands which bring up some very noticeable downsides, to name a few, you can't specify the area that you want to remove off, the output videos have black bars. Besides, Windows Movie Maker was phased out by Microsoft as early as 2017 which doesn't support the 4K outcome, and the video has to be encapsulated in MP4 WMV formats.
How to Change Aspect Ratio of Video on Windows 11/10 with Movie Maker?
1: After adding videos to Windows Movie Maker, come over to the Project, and click it. Now you will find 2 options of aspect ratio: Widescreen (16:9) and Standard (4:3). Hit on the needed aspect ratio.

2: Go to File, click Save movie. Select the ideal output format from the long list of output presets offered by Movie Maker. You can also click My Customize to create a customized preset. By inputting the proper value of width and height resolution, the result can be 1:1, 5:4, or other aspect ratios.
Note:
Hover over the mouse to one of the shown preset options to find the related ratio (widescreen or standard) and resolution information. It has to the same as what you've already selected in project settings, or the resulting video will be different from what you see in the preview windows.
4. Change Video Aspect Ratio in VLC Media Player

VLC media player is an open-source and versatile multiple media player on Mac and Windows. With it, you can convert the video aspect ratio temporarily, so it can play your videos without black borders or distortion. To do so, come to the top ribbon to find the Video icon, click it, and choose Aspect Ratio. You will then be given a list of the aspect ratios available in VLC media player, hit the one that matches the source video. The problem is, when your target is changing the aspect ratio of the source video, you have to use the Crop tool to redefine the ratios. The process is extremely complicated and the result has black bars.
Check step-by-step guide on how to crop video ratios in VLC media player >>.
5. Change Video Aspect Ratio in HitFilm Express
It might need some exploration to have HitFilm installed on your computer. This is because you have to log up a HitFilm account, fill up personal information to get the download link. Besides, you need to activate the software to remove the big brand logo in the center of the outcome. But, overall, the process to change aspect ratio is easy enough for newbies.
How to Change Aspect Ratio of Video in HitFilm?
1: Click the New tab, and choose an appropriate project settings option from the given lists. Hit OK.
2: Go to the Media panel which can be found on the left bottom of the interface. Right-click on the blank area, click Import > Media to load up the source footage.
3: Click File, and tab Project Settings to find aspect ratio options on the new panel. Keep it to be square. Uncheck the link icon between Width and Length, and then input the wanted resolution, and then click OK to preview the video in aspect ratio.

4: In the preview Windows, you can use the red/green/gray icon to adjust the area of frames.
5: Click Export and hit New Preset. After choose the proper format, you can set resolution value as follow the source.
6: Hit the Export icon which is above the timeline to require HitFilm Express to begin to convert the aspect ratio of your clips.
6. Change Video Aspect Ratio in DaVinci Resolve
Davinci Resolve is a free and cross-platform video editor that has a plethora of features while still keeping a clear interface. If you are a beginner, but still want to acquire more knowledge in video editing, we suggest you try it out. Among the many ways to resize the video aspect ratio, there I share my personal favorite workflow.
How to Change Video Aspect Ratio of Video in DaVinci Resolve?
1: Directly drag the video from the disk to the timeline of DaVinci Resolve.
2: Come over to the media pool and right-click the loaded video to find the Timeline Settings tab. Click on this and then hit Use Customized Settings.
3: There you can change the aspect ratio of the clip by adjusting the resolution information. In my case, the original video resolution is 1920 x 1080p (16:9), I change it to 1080 x 1080 as I need 1:1 output.

4: Select the needed Mismatched resolution filters from Center crop with no resizing, Scale full frame with crop, Scale entire image to fit, and stretch frame to all corners. See their differences in the below picture.

5: Hit OK to exit the setting. Click Edit to enter the edit panel, and then increase/decrease the number under the transform tab to scale up/down the video. You can also adjust the value in the Position option to reposition the footage in the canvas. This step is for getting rid of the black bar.
6: Click Deliver to go to the delivery panel. After setting up the format and codec information, hit Add to Render Queue. Go to the Start Render tab, and click on it to let DaVinci Resolve start to change the aspect ratio of your video.
7. Change Video Aspect Ratio in Final Cut Pro
To speak of working performance and editing features, Final Cut Pro is on par with Premiere Pro. Both of them have all the bells and whistles required by video editing experts. Be that as it may, Final Cut Pro enables you to convert video aspect ratio in a snap. In this well-distributed program, it doesn't ever feel like you're trying to wade through a sea of tools to find the right one properly resizing the video dimension. You will know why I have arrived at this view after reading the below tutorial.
How to Change Video Aspect Ratio of Video in Final Cut Pro on Mac?
1: Hit the project on the Libraries Sidebar to open up Project Properties inspector.
2: Click the Modify button to project settings modification window. There you can change the resolution property as appropriate. Suppose the original file is a 16:9 video in a resolution of 1920x1080p and what you want is 1:1, here you can go with 1080 x 1080p. Choose OK.

3: You now should see the Transform option on the left of the preview windows. This is for you to scale up/down footage and fine-tune its position to get rid of black edges.
Everything You Should Know about Aspect Ratio
What Is Aspect Ratio of Monitor or Displays
The aspect ratio of monitors or displays describes the proportional relations between the width and height of a monitor. 20 years ago, almost all the displays of SD televisions come with the ratio of length to height is 4:3. Now, HD and UHD televisions are in everyone's home and the majority of them have a wider screen at the ratio of 16:9 which is also the new norm of most computer screens and other kinds of media player monitors.
What is the Aspect Ratio of a Video
It indicates the width of a video in relation to its height. You can know the aspect ratio of a video by calculating the ratio of the horizontal and vertical pixels. Suppose the resolution of your clip is 1920 pixel (w) x 1080 pixel (h), then it's aspect ratio should be 16:9 which is also known as 1.77. Most consumer cameras allow you to choose 16:9, 4:3, 1:1, and other different aspect ratios. Note: iPhone records 4:3 videos only.
The ratio of the recorded video frame is determined by the shape of the imaging sensors which mostly have 3:2 (full frame digital camera and APS-C DSLR camera) and 4:3 (mobile phone and medium format cameras) aspect ratio. Therefore, when you are setting aspect ratio apart from 3:2 or 4:3, lets' say, 16:9, the camera is just lopping off the upper and lower partial of the frame.
These are the Best Video Aspect Ratio for Facebook and Instagram
We all know widescreen and square format videos are liked by most social media platforms. However, the accepted video aspect ratios for different social media are not exactly the same and the standard is ever-changing. Take a look at the best video ratios for popular social media platforms.
- Facebook Feed Video - 16:9 9:16
- Facebook cover video and In-stream video ads - 16:9
- Facebook 360 video - 1:1 2:1
- Facebook Messenger video ads - 16:9 1.91:1
- Instagram in-feed video -- 1:1 1.9:1 and 4:5
- Instagram carousel video ads -- 1:1
- Instagram stories video ads -- 16:9 4:5 9:16
Other social media platforms
- Twitter -- 1:1 1:2.39 2.39:1
- Snapchat -- 9:16 16:9
- YouTube -- 16:9 4:3
- LinkedIn -- 16:9 1:1 9:16
- Pinterest video ads -- 1:2 2:3 9:16 16:9
- TikTok -- 9:16. 1:1 9:16 1:1
If the shape of the video doesn't match the proportion of the screen …
Many televisions and video players won't play videos that mismatches its aspect ratio. A few can get the job done, however, there would be the issues of distorted pixels. Here is what a widescreen (16:9) video looks like when playing on a standard screen (4:3). The footage are obviously stretched elongated.

How is the Aspect Ratio Being Changed?
Generally, there are 3 methods to change the frame size for matching it with the shape of the monitors or social media sites:
1. Crop
The aspect ratio of the video is determined by the dimension ratio of length and width. That's why you can alter the aspect ratio by chopping off the top, bottom, right, or left of a video. The cropper tool in the market usually gives you 2 ways to crop a video for changing the ratio:
1) Offer you a cropping border on the preview window, and you can drag the border to change the frame size. The result is the entire frames inside the cropping box. Photos app on iPhone, Avidemux, and VideoProc on Windows and Mac, Kapwing on browsers can change the aspect ratio of your video in this way.
2) Require you enter values in pixels on the given top, bottom, left, and right options. This is the workflow of many advanced video converters like Handbrake, and professional video aspect ratio size changer like VideoProc, and Kapwing.
3) Add your video to a canvas (sequence) that comes with the target aspect ratio. Zoom in and out the original video and change its position on the canvas to decide the ranges the footage that need to be left. This is how you shift the ratio of length to width of a video by using Premiere Pro, DaVinci Resolve, Final Cut Pro, and most advanced video editing software.
2. Create black bars
By adding letterbox, pillarbox, or windowbox bars, you can change the ratio of video without losing details as any frames.
• Letterbox. Pad black bars to the top and bottom of the widescreen video, so its sides won't be removed off when playing it on a 4:3 or other vertical displays. This can also make your video more cinematic.

• Pillarbox. Add black edges on either side of a portrait video for properly displaying them on a 16:9 and other wide screens.

• Windowbox. Put black bars on every side of the video. This is not friendly for a viewer's experience. Therefore, you may don't want to manually add this. But, some video player will automatically create windowbox bars when you watch a standard size video that manually converted from a horizontal content on a 16:9 screen.

Some televisions and desktop media players can auto change the video ratio that doesn't match with by generating those bars. Besides, social media like YouTube can display native 4:3 or 5:4 videos with the pillarbox technique within its 16 by 9 player. However, what's worth noticing is that the native video may look much smaller with those bars. To have better control over the whole frames, you'd better use professional tools like VideoProc to add black edges. With it, you can letterbox your video to shift aspect ratio as well as give your video a cinematic look.
Note: The Windows version now supports AI-powered Super Resolution, Frame Interpolation, and Stabilization to enhance video and image quality. These AI features are not yet available in the Mac version but will be coming soon.


