Start a Project
Let's start the edits by creating a new project in VideoProc Vlogger. In this tutorial, you'll learn how to create a new project, how to open an existing project, as well as how to save and archive a project.
Free download VideoProc Vlogger and create your first project.
Watch video tutorial on how to start a project in VideoProc Vlogger, or read text instructions below.
Create New Project
Step 1 Open the Project setting panel
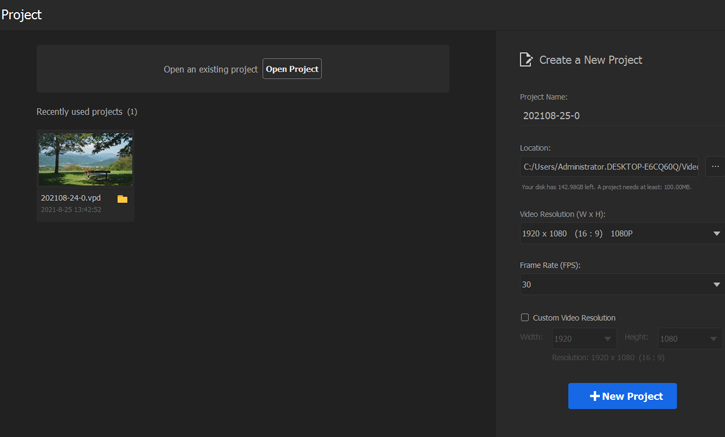
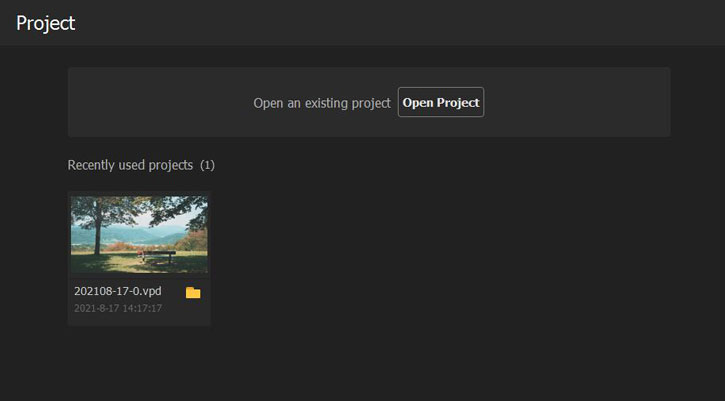
Launch up VideoProc Vlogger. This will automatically open the Project setting panel.
If you're already on the editing page of the program, press VideoProc Menu on the top left corner and then choose Create New Project. Alternatively, press Ctrl + N on your keyboard.
Step 2 Set up the project
Navigate to the right side of the Project panel.
- In the setting menu of Project Name, enter the project name.
- In the setting menu of Location, hit the ellipsis button to assign output file folder. VideoProc Vlogger will display the available storage space of the chosen disc and the space required by the project.
- In the Resolution drop-down menu, select the desired resolution from the given options.
- In the Frame Rate (FPS) menu, select the wanted frame rate from the given options (30/60/120).

 Editing Tips
Herein, you can find a few presets for popular devices including iPhone, iPad, Note 40, and Note 20. Just make the choice according to your specific demand. For instance:
- Choose 2532x1170P to edit videos for viewing on iPhone.
- Choose 1920x1080P [HD], 2560x2440P [2K], or 3840x216P [4K] to edit videos for YouTube, Vimeo...
- Choose 1080x1920P [HD] to edit videos for IGTV, Instagram Story, Snapchat, TikTok, etc.
- Choose 1280x720P if edit videos for Facebook Video or a small screen.
To customize the resolution, hit the Custom Video Resolution button and then select the wanted value from the drop-down menu of Width and Length.
Step 3Confirm the settings
Hit the +New Project button to confirm the settings and create a new project.
Open Project
You can open an existing project in 3 easy ways.
• When on the main interface, press VideoProc Menu on the top left corner, hit Open Project and then double-click the target project on the pop-up Windows Explorer panel.
• When on the main interface, press Ctrl + O on your keyboard.
• Locate the project that you've saved on the computer. Right-click that. Hit Open with > VideoProc Vlogger.

Save Project
By saving the project, you can save an unfinished project and all of the changes that you have made upon that for completion later. Here are two ways to do so.
• Press CTR + S or hit VideoProc Menu > Save Project.
In this way, you'll update the lastly saved project file with the latest content.

• Press Ctrl + Shift + S or hit VideoProc Menu > Save Project As. This will open up the Save Project As panel. Enter the new name. Hit the 3-dot button in the setting menu of Project Directory to choose the folder for storing the project. After that, press Save.
In this way, you can store a new project file or store the existing project in a new location with the same or different project name.

Archive Project
If you need to hand the working project off to someone else or another computer, you'll need to archive the project. To do so, press Ctrl + E or hit VideoProc Menu > Archive Project.

 Editing Tips
To open up an archived project, there are two ways:
- • Double click the .vpd file contained in the archived project file folder.
- • hit VideoProc Menu > Open Project on the main interface of VideoProc Vlogger. Select the .vpd file located in the archived project folder. Hit Open.
Close Project
If you need to close the working project, press Shift + C or press VideoProc Menu and choose Close Project.
VideoProc Vlogger will then ask you do you need to save the changes you made to this project. You can:

- Press Save if you need to close the project and saving it.
- Press Don't Save if you need to close the project without saving it.
- Press Cancel to exit closing the project.
Free download VideoProc Vlogger and start edits with creating your first project.
- > Introduction to Video Interface
- > Using Timeline in VideoProc Vlogger
- > Introduction to Preference Settings
- > Reduce Background Noise of Video & Audio
- > VideoProc Vlogger - Hardware Acceleration
For more guides of VideoProc Vlogger, please visit this page >
If you have any question, please email us or visit

